Creating a review and rating UI in Flutter involves several steps. Below is a step-by-step guide to help you build a basic UI for a review and rating system.
1. Set Up Your Flutter Project
- Ensure that Flutter and Dart are properly installed.
- Create a new Flutter project by running:
bash flutter create review_rating_ui - Navigate to the project directory:
bash cd review_rating_ui
2. Add Dependencies
- You may want to add some useful packages for handling UI components. Open
pubspec.yamland add:yaml dependencies: flutter: sdk: flutter flutter_rating_bar: ^4.0.0 - Run
flutter pub getto install the package.
3. Design the UI
- Open the
lib/main.dartfile and start by defining your main app structure.
import 'package:flutter/material.dart';
import 'package:flutter_app/file.dart';


void main() {
  runApp(MyApp());
}

class MyApp extends StatelessWidget {
  @override
  Widget build(BuildContext context) {
    return MaterialApp(
      title: 'Review & Rating UI',
      theme: ThemeData(
        primarySwatch: Colors.blue,
      ),
      home: ReviewScreen(),
    );
  }
}
4. Build the Review and Rating UI
- Inside the
_ReviewRatingPageState, implement the UI.
import 'package:flutter/material.dart';
import 'package:flutter_rating_bar/flutter_rating_bar.dart';

class ReviewScreen extends StatefulWidget {
  @override
  ReviewScreenState createState() => ReviewScreenState();
}

class _ReviewScreenState extends State<ReviewScreen> {
  double _rating = 3.0;
  TextEditingController _reviewController = TextEditingController();

  @override
  Widget build(BuildContext context) {
    return Scaffold(
      appBar: AppBar(
        title: Text("Review & Rating"),
      ),
      body: Padding(
        padding: const EdgeInsets.all(16.0),
        child: Column(
          crossAxisAlignment: CrossAxisAlignment.start,
          children: [
            Text(
              "Rate the Product:",
              style: TextStyle(fontSize: 18.0, fontWeight: FontWeight.bold),
            ),
            SizedBox(height: 10.0),
            RatingBar.builder(
              initialRating: _rating,
              minRating: 1,
              direction: Axis.horizontal,
              allowHalfRating: true,
              itemCount: 5,
              itemPadding: EdgeInsets.symmetric(horizontal: 4.0),
              itemBuilder: (context, _) => Icon(
                Icons.star,
                color: Colors.amber,
              ),
              onRatingUpdate: (rating) {
                setState(() {
                  _rating = rating;
                });
              },
            ),
            SizedBox(height: 20.0),
            Text(
              "Write a Review:",
              style: TextStyle(fontSize: 18.0, fontWeight: FontWeight.bold),
            ),
            SizedBox(height: 10.0),
            TextField(
              controller: _reviewController,
              maxLines: 5,
              decoration: InputDecoration(
                border: OutlineInputBorder(),
                hintText: "Write your review here",
              ),
            ),
            SizedBox(height: 20.0),
            Center(
              child: ElevatedButton(
                onPressed: () {
                  _submitReview();
                },
                child: Text("Submit"),
              ),
            ),
          ],
        ),
      ),
    );
  }

  void _submitReview() {
    String review = _reviewController.text;
    double rating = _rating;

    // You can add the code to save the review and rating here.
    print("Review: $review");
    print("Rating: $rating");

    // For now, we'll just show a simple dialog.
    showDialog(
      context: context,
      builder: (context) => AlertDialog(
        title: Text("Review Submitted"),
        content: Text("Rating: $rating\nReview: $review"),
        actions: [
          TextButton(
            onPressed: () {
              Navigator.of(context).pop();
            },
            child: Text("OK"),
          ),
        ],
      ),
    );
  }
}
5. Run the Application
- Run your Flutter app using:
bash flutter run
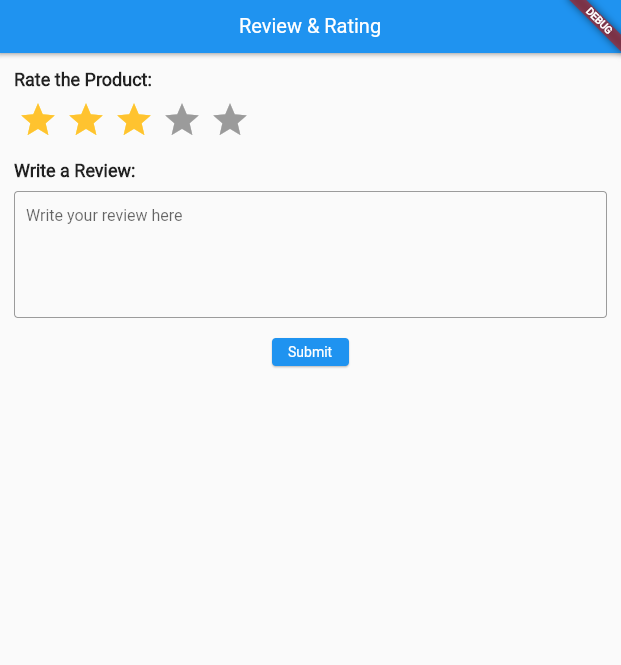
Output
6. Enhance the UI (Optional)
- You can further enhance the UI by adding features like:
- Displaying existing reviews.
- Showing an average rating.
- Using images or icons for rating.
- Adding animations or custom widgets.
7. Handling Backend (Optional)
- If you need to save or retrieve reviews and ratings, you might want to set up a backend using Firebase, REST APIs, or any other database service.
- Integrate it with your Flutter app using HTTP requests or Firebase packages.
This should give you a basic and functional review and rating UI in Flutter!
Related Articles
- How to make Ludo app in Flutter with Source Code Step by step
- How to make PDF Reader app in Flutter with Source Code Step by step
- How to make QR Scanner app in Flutter with Source Code Step by step
- How to Make a ToDo App with Flutter with source Code StepWise in 2024
- What is package in Flutter (Dart) with example in 2024
- What is class in Flutter(Dart) with example step by step
- Advantage of Flutter with examples in 2024
- How to Make Image to Pdf Converter app in Flutter
- How to make custom BottomNavigationBar in flutter
- Creating a Ludo app in Flutter with Source Code


0 Comments